Contents
Cameras take photos. Nowadays, they can also take video. But have you ever wondered how exactly they do that? If you’re interested in the answer, and how the answer might help you in choosing the right trail camera, read on.
And if you have any questions after reading, be sure to contact us
here or at our
Facebook page and we will get back to you asap.
1. Trail Camera Trigger Speed
When you’re looking to buy a trail camera, what can help you decide between quality cameras versus not-so-good ones? For a great many people, what they look for first is photo resolution, to ensure the photos the camera takes are of the highest quality possible.
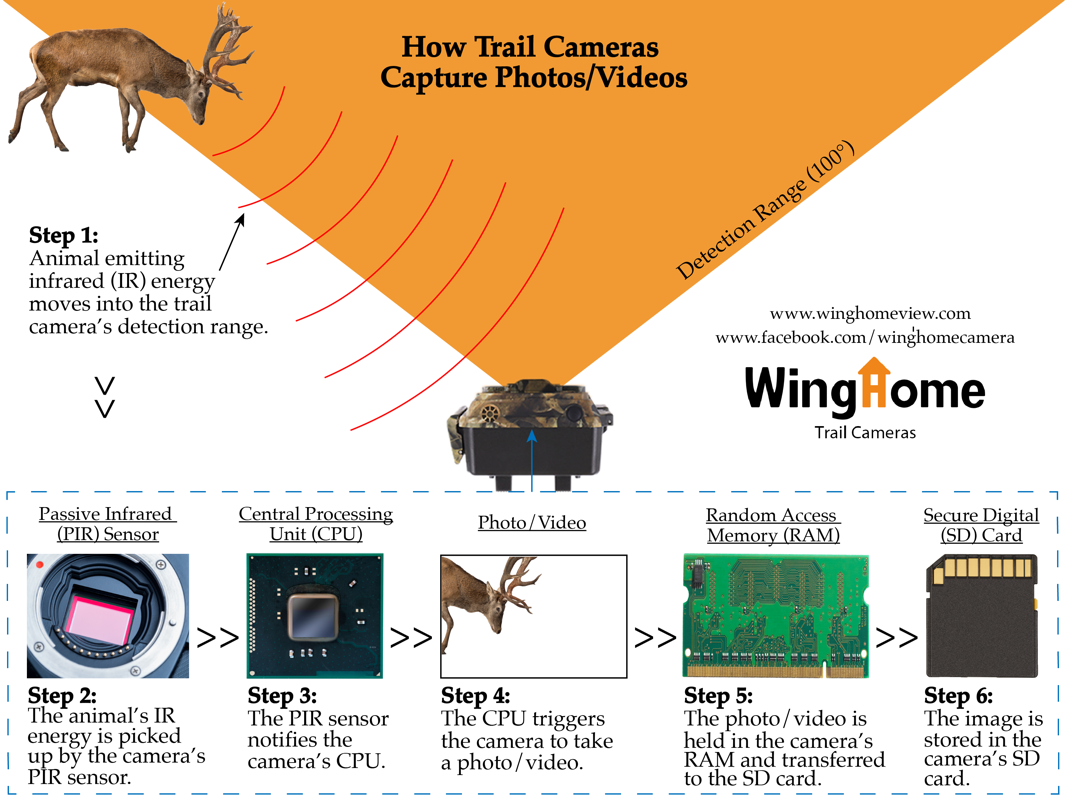
Probably second on the list, though, is ‘trigger speed’. And related to trigger speed is ‘recovery speed’. But what exactly do ‘trigger speed’ and ‘recovery speed’ mean in relation to trail cameras? To clear things up, let’s take a look at the following infographic…

That might be enough for you to figure out the workings of trail cameras, but in order to figure out why different trail cameras have different trigger and recovery speeds, let’s go into each step in a bit more detail…
2. Steps of capturing trail camera photos/videos
1) Infrared Energy

This is in fact a kind of light, but light just below the visible spectrum, so we can’t see it with the naked eye. However, anything that has a temperature gives it off, so you can think of it as a kind of light that corresponds with heat.
Now, during the daytime, pretty much everything in a scene will give off infrared light, though most things like grass, leaves and vegetation only give it off via the reflected heat of the sun.
However, animals that produce their own internal heat will give off far more infrared light. It’s this difference in infrared light between the low infrared of the natural scene and the relatively high amount of infrared given off by warm-blooded animals that trail cameras take advantage off when taking photos.
But, of course, trail cameras can’t detect an animal’s infrared light just because it’s nearby. There is a particular area, in front of the camera, at an angle of around 100 degrees and a distance of around 65 feet, in which trail cameras can ‘receive’ the infrared light of a passing animal.
Once an animal passes into that ‘detection zone’, the infrared it is constantly giving off can be detected by the trail camera. And one part of the trail cam in particular….
2) PIR

As you can see in the infographic, PIR stands for ‘passive infrared’. What this means is that the camera is not actively giving off infrared light, it is ‘passively’ receiving the infrared light of other objects, in this case that of animals.
But this ‘sensor’, located just in front of the camera’s lens, is not, in fact, activated by infrared light. As we just saw, everything that has a temperature (i.e. above 0-degrees Kelvin) gives off some level of infrared light. What activates it is a shift in the amount of infrared light in the scene.
Say the infrared light of the natural scene, from leaves, trees etc. is at a level 10. But an animal’s infrared light is a at a level 20. When the animal moves into the detection range of the camera, it is this difference in infrared light levels that will trigger the PIR sensor.
Once the PIR sensor has noticed that there is now an animal in front of the camera, the PIR sensor passes this information onto the…
3) Central Processing Unit (CPU)

Located just behind the PIR sensor, the CPU is in control of the trail camera’s functions. Just like the CPU on a computer, it can be seen as the core of the device.
One of its primary purposes is to receive the information from the PIR sensor that there is an animal in the camera’s scene. With this information, it then controls the camera’s shutter, triggering the taking of a…
4) Photo/Video

According to the settings you’ve programmed on the camera, a single photo, multiple photos (2-5), a video, or photo followed by a video, will now be take.
This might seem like the end, but it’s not enough just to take the photo or video, it also needs to be stored so you can access it later…
5) RAM

This part of the process might be easy to overlook, and unlike with computers, you don’t often see it listed as part of the trail camera’s specifications. However, it can be just as important, and if your trail camera doesn’t have enough of it, you’ll soon notice.
Think of it like the camera’s short-term memory. Just like when you see something with your eye, you first have to remember it in your short-term memory before it gets stored in your long-term memory, the same is true for cameras. The photos or videos the camera takes, first go into this ‘short-term memory’ before being transferred to the cameras’ ‘long-term memory’, i.e. the storage.
The RAM is also responsible for transferring the photo or video to the…
6) SD Card

This is the camera’s ‘long-term memory’, the storage, and is the final stage of your trail camera capturing photos or videos.
To continue the use of metaphors, think of it like a warehouse. Just like a warehouse, the larger it is, the longer it takes to find a place to store what needs to be kept. This is why the limit for trail camera SD cards generally speaking is 32GB, even though SD cards come in capacities of up to 2TB. But for a fast-acting device like a trail camera, using SD cards above 32GB would significantly slow things down.
Now we’ve got all that covered, it can help us in understanding what determines a camera’s trigger speed and recovery time.
3. Trigger speed
If we go back to our infographic, we can see that the camera’s trigger speed refers to steps 2-4, i.e. the PIR sensor detecting an animal, passing this information onto the CPU and then the CPU triggering the taking of the photo or video.
Now, PIR sensors in trail cameras are all pretty much the same, with the technology having been established for many years at this point.
What makes the difference then in terms of trigger speed between different cameras is the CPU. The faster and more efficient the CPU, the faster the information from the PIR sensor will be processed and the faster the photo or video will be taken.
So, when you see a trail camera with a trigger speed of 1 second versus one with a trigger speed of 0.4 seconds or even lower, the difference between those cameras is that the second has a more powerful CPU.
If all you wanted was your camera to take a single photo or video, this would be all that mattered. However, if your camera is set to take individual photos, you’re likely going to want to take a number of photos as the animal walks past, and not just one photo as it walks into frame.
In order to ensure this, you need to make sure that after taking the first photo, the camera can soon be ready to trigger again and take a second photo, third, fourth and so on.
For this, we need to take a look at….
4. Recovery time
So, as you can probably guess, this is related to the final part our infographic, steps 4-6. After the first photo has been taken, it then needs to be transferred via the camera’s RAM to the SD card where it is stored. Having successfully stored the photo, the camera can then recover and be ready to take another shot.
We’ve already looked at the SD card and why most all trail cameras take a maximum 32GB SD card. The difference then between trail cameras with a fast recovery time versus a slow one, is the amount of RAM the camera has.
5. Conclusion
Hope that’s cleared things up for you around trigger speed and recovery speed. You now know that the key factor for trigger speed is the CPU, and for the recovery speed it’s the RAM.
As for trigger speed, it’s very easy to ascertain this specification of whatever camera you’re looking at purchasing, as it’s usually listed at the very top of the list of specifications.
Unfortunately, as I said, you won’t generally see RAM listed among the camera’s technical specifications. It might be worth then asking your trail camera dealer or contacting the manufacturer directly.
At WingHome, our
350C flagship trail camera has a RAM of 1GB, which is more than enough to ensure a rapid recovery time. And it comes with a trigger speed of 0.4 seconds. Again, more than fast enough to capture even the fastest moving critter.
As always, is you have any more questions regarding this topic, or trail cameras in general, don’t hesitate to
email us at or chat with us directly on our
Facebook page.
Happy trails from the WingHome team!


